超详细Netty入门,看这篇就够了!
前言
本文主要讲述Netty框架的一些特性以及重要组件,希望看完之后能对Netty框架有一个比较直观的感受,希望能帮助读者快速入门Netty,减少一些弯路。
一、Netty概述
官方的介绍:
Netty is an asynchronous event-driven network application framework
for rapid development of maintainable high performance protocol servers & clients.
Netty是 一个异步事件驱动的网络应用程序框架,用于快速开发可维护的高性能协议服务器和客户端。
二、为什么使用Netty
从官网上介绍,Netty是一个网络应用程序框架,开发服务器和客户端。也就是用于网络编程的一个框架。既然是网络编程,Socket就不谈了,为什么不用NIO呢?
2.1 NIO的缺点
对于这个问题,之前我写了一篇文章《NIO入门》对NIO有比较详细的介绍,NIO的主要问题是:
- NIO的类库和API繁杂,学习成本高,你需要熟练掌握Selector、ServerSocketChannel、SocketChannel、ByteBuffer等。
- 需要熟悉Java多线程编程。这是因为NIO编程涉及到Reactor模式,你必须对多线程和网络编程非常熟悉,才能写出高质量的NIO程序。
- 臭名昭著的epoll bug。它会导致Selector空轮询,最终导致CPU 100%。直到JDK1.7版本依然没得到根本性的解决。
2.2 Netty的优点
相对地,Netty的优点有很多:
- API使用简单,学习成本低。
- 功能强大,内置了多种解码编码器,支持多种协议。
- 性能高,对比其他主流的NIO框架,Netty的性能最优。
- 社区活跃,发现BUG会及时修复,迭代版本周期短,不断加入新的功能。
- Dubbo、Elasticsearch都采用了Netty,质量得到验证。
三、架构图
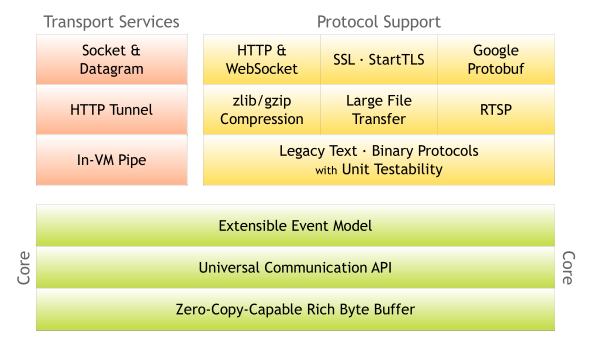
上面这张图就是在官网首页的架构图,我们从上到下分析一下。
绿色的部分Core核心模块,包括零拷贝、API库、可扩展的事件模型。
橙色部分Protocol Support协议支持,包括Http协议、webSocket、SSL(安全套接字协议)、谷歌Protobuf协议、zlib/gzip压缩与解压缩、Large File Transfer大文件传输等等。
红色的部分Transport Services传输服务,包括Socket、Datagram、Http Tunnel等等。
以上可看出Netty的功能、协议、传输方式都比较全,比较强大。
四、永远的Hello Word
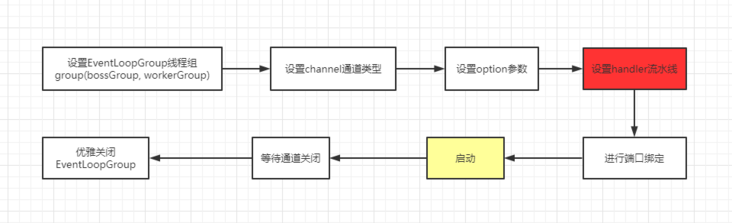
首先搭建一个HelloWord工程,先熟悉一下API,还有为后面的学习做铺垫。以下面这张图为依据:
4.1 引入Maven依赖
使用的版本是4.1.20,相对比较稳定的一个版本。
<dependency>
    <groupId>io.netty</groupId>
    <artifactId>netty-all</artifactId>
    <version>4.1.20.Final</version>
</dependency>
4.2 创建服务端启动类
public class MyServer {
    public static void main(String[] args) throws Exception {
        //创建两个线程组 boosGroup、workerGroup
        EventLoopGroup bossGroup = new NioEventLoopGroup();
        EventLoopGroup workerGroup = new NioEventLoopGroup();
        try {
            //创建服务端的启动对象,设置参数
            ServerBootstrap bootstrap = new ServerBootstrap();
            //设置两个线程组boosGroup和workerGroup
            bootstrap.group(bossGroup, workerGroup)
                //设置服务端通道实现类型
                .channel(NioServerSocketChannel.class)
                //设置线程队列得到连接个数
                .option(ChannelOption.SO_BACKLOG, 128)
                //设置保持活动连接状态
                .childOption(ChannelOption.SO_KEEPALIVE, true)
                //使用匿名内部类的形式初始化通道对象
                .childHandler(new ChannelInitializer<SocketChannel>() {
                        @Override
                        protected void initChannel(SocketChannel socketChannel) throws Exception {
                            //给pipeline管道设置处理器
                            socketChannel.pipeline().addLast(new MyServerHandler());
                        }
                    });//给workerGroup的EventLoop对应的管道设置处理器
            System.out.println("java技术爱好者的服务端已经准备就绪...");
            //绑定端口号,启动服务端
            ChannelFuture channelFuture = bootstrap.bind(6666).sync();
            //对关闭通道进行监听
            channelFuture.channel().closeFuture().sync();
        } finally {
            bossGroup.shutdownGracefully();
            workerGroup.shutdownGracefully();
        }
    }
}
4.3 创建服务端处理器
/**
 * 自定义的Handler需要继承Netty规定好的HandlerAdapter
 * 才能被Netty框架所关联,有点类似SpringMVC的适配器模式
 **/
public class MyServerHandler extends ChannelInboundHandlerAdapter {

    @Override
    public void channelRead(ChannelHandlerContext ctx, Object msg) throws Exception {
        //获取客户端发送过来的消息
        ByteBuf byteBuf = (ByteBuf) msg;
        System.out.println("收到客户端" + ctx.channel().remoteAddress() + "发送的消息:" + byteBuf.toString(CharsetUtil.UTF_8));
    }

    @Override
    public void channelReadComplete(ChannelHandlerContext ctx) throws Exception {
        //发送消息给客户端
        ctx.writeAndFlush(Unpooled.copiedBuffer("服务端已收到消息,并给你发送一个问号?", CharsetUtil.UTF_8));
    }

    @Override
    public void exceptionCaught(ChannelHandlerContext ctx, Throwable cause) throws Exception {
        //发生异常,关闭通道
        ctx.close();
    }
}
4.4 创建客户端启动类
public class MyClient {

    public static void main(String[] args) throws Exception {
        NioEventLoopGroup eventExecutors = new NioEventLoopGroup();
        try {
            //创建bootstrap对象,配置参数
            Bootstrap bootstrap = new Bootstrap();
            //设置线程组
            bootstrap.group(eventExecutors)
                //设置客户端的通道实现类型
                .channel(NioSocketChannel.class)
                //使用匿名内部类初始化通道
                .handler(new ChannelInitializer<SocketChannel>() {
                        @Override
                        protected void initChannel(SocketChannel ch) throws Exception {
                            //添加客户端通道的处理器
                            ch.pipeline().addLast(new MyClientHandler());
                        }
                    });
            System.out.println("客户端准备就绪,随时可以起飞~");
            //连接服务端
            ChannelFuture channelFuture = bootstrap.connect("127.0.0.1", 6666).sync();
            //对通道关闭进行监听
            channelFuture.channel().closeFuture().sync();
        } finally {
            //关闭线程组
            eventExecutors.shutdownGracefully();
        }
    }
}
4.5 创建客户端处理器
public class MyClientHandler extends ChannelInboundHandlerAdapter {

    @Override
    public void channelActive(ChannelHandlerContext ctx) throws Exception {
        //发送消息到服务端
        ctx.writeAndFlush(Unpooled.copiedBuffer("歪比巴卜~茉莉~Are you good~马来西亚~", CharsetUtil.UTF_8));
    }

    @Override
    public void channelRead(ChannelHandlerContext ctx, Object msg) throws Exception {
        //接收服务端发送过来的消息
        ByteBuf byteBuf = (ByteBuf) msg;
        System.out.println("收到服务端" + ctx.channel().remoteAddress() + "的消息:" + byteBuf.toString(CharsetUtil.UTF_8));
    }
}
4.6 测试
先启动服务端,再启动客户端,就可以看到结果:
MyServer打印结果:

MyClient打印结果:

五、Netty的特性与重要组件
5.1 taskQueue任务队列
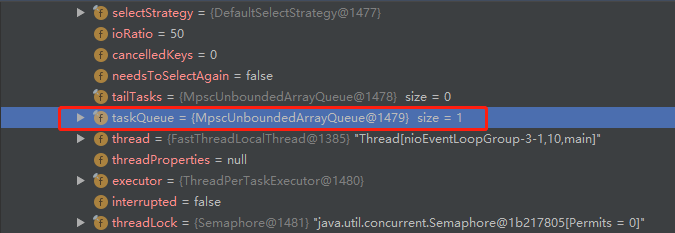
如果Handler处理器有一些长时间的业务处理,可以交给taskQueue异步处理。怎么用呢,请看代码演示:
public class MyServerHandler extends ChannelInboundHandlerAdapter {

    @Override
    public void channelRead(ChannelHandlerContext ctx, Object msg) throws Exception {
        //获取到线程池eventLoop,添加线程,执行
        ctx.channel().eventLoop().execute(new Runnable() {
            @Override
            public void run() {
                try {
                    //长时间操作,不至于长时间的业务操作导致Handler阻塞
                    Thread.sleep(1000);
                    System.out.println("长时间的业务处理");
                } catch (Exception e) {
                    e.printStackTrace();
                }
            }
        });
    }
}
我们打一个debug调试,是可以看到添加进去的taskQueue有一个任务。
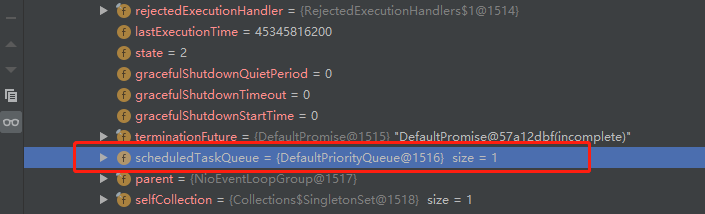
5.2 scheduleTaskQueue延时任务队列
延时任务队列和上面介绍的任务队列非常相似,只是多了一个可延迟一定时间再执行的设置,请看代码演示:
ctx.channel().eventLoop().schedule(new Runnable() {
    @Override
    public void run() {
        try {
            //长时间操作,不至于长时间的业务操作导致Handler阻塞
            Thread.sleep(1000);
            System.out.println("长时间的业务处理");
        } catch (Exception e) {
            e.printStackTrace();
        }
    }
},5, TimeUnit.SECONDS);//5秒后执行
依然打开debug进行调试查看,我们可以有一个scheduleTaskQueue任务待执行中
5.3 Future异步机制
在搭建HelloWord工程的时候,我们看到有一行这样的代码:
ChannelFuture channelFuture = bootstrap.connect("127.0.0.1", 6666);很多操作都返回这个ChannelFuture对象,究竟这个ChannelFuture对象是用来做什么的呢?
ChannelFuture提供操作完成时一种异步通知的方式。一般在Socket编程中,等待响应结果都是同步阻塞的,而Netty则不会造成阻塞,因为ChannelFuture是采取类似观察者模式的形式进行获取结果。请看一段代码演示:
//添加监听器
channelFuture.addListener(new ChannelFutureListener() {
    //使用匿名内部类,ChannelFutureListener接口
    //重写operationComplete方法
    @Override
    public void operationComplete(ChannelFuture future) throws Exception {
        //判断是否操作成功
        if (future.isSuccess()) {
            System.out.println("连接成功");
        } else {
            System.out.println("连接失败");
        }
    }
});
5.4 Bootstrap与ServerBootStrap
Bootstrap和ServerBootStrap是Netty提供的一个创建客户端和服务端启动器的工厂类,使用这个工厂类非常便利地创建启动类,根据上面的一些例子,其实也看得出来能大大地减少了开发的难度。首先看一个类图:
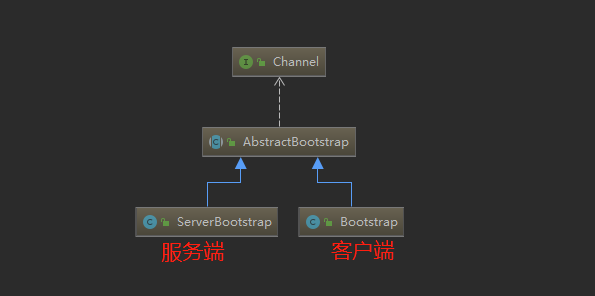
可以看出都是继承于AbstractBootStrap抽象类,所以大致上的配置方法都相同。
一般来说,使用Bootstrap创建启动器的步骤可分为以下几步:
5.4.1 group()
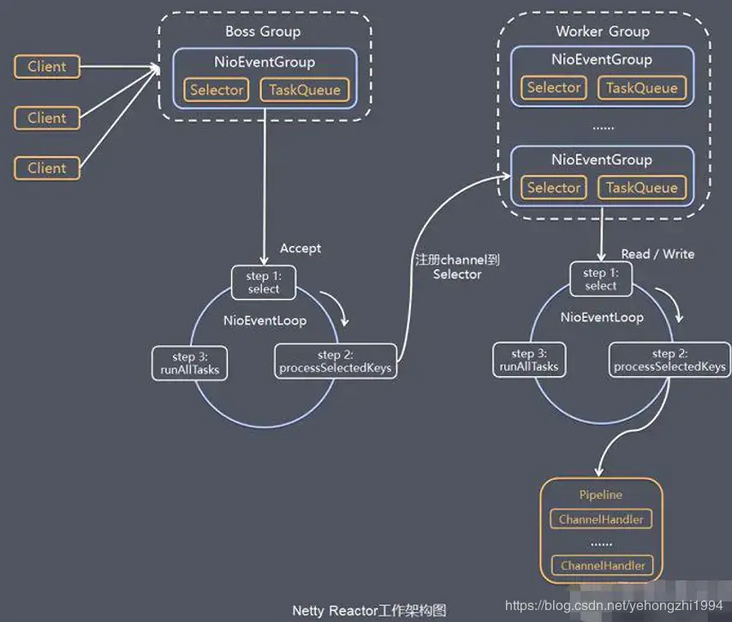
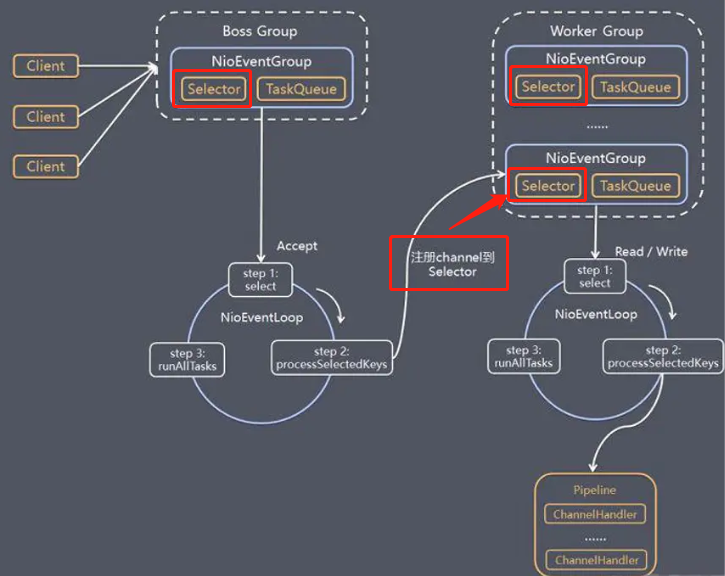
在上一篇文章《Reactor模式》中,我们就讲过服务端要使用两个线程组:
- bossGroup 用于监听客户端连接,专门负责与客户端创建连接,并把连接注册到workerGroup的Selector中。
- workerGroup用于处理每一个连接发生的读写事件。
一般创建线程组直接使用以下new就完事了:
EventLoopGroup bossGroup = new NioEventLoopGroup();
EventLoopGroup workerGroup = new NioEventLoopGroup();
有点好奇的是,既然是线程组,那线程数默认是多少呢?深入源码:
//使用一个常量保存
    private static final int DEFAULT_EVENT_LOOP_THREADS;

    static {
        //NettyRuntime.availableProcessors() * 2,cpu核数的两倍赋值给常量
        DEFAULT_EVENT_LOOP_THREADS = Math.max(1, SystemPropertyUtil.getInt(
                "io.netty.eventLoopThreads", NettyRuntime.availableProcessors() * 2));

        if (logger.isDebugEnabled()) {
            logger.debug("-Dio.netty.eventLoopThreads: {}", DEFAULT_EVENT_LOOP_THREADS);
        }
    }

    protected MultithreadEventLoopGroup(int nThreads, Executor executor, Object... args) {
        //如果不传入,则使用常量的值,也就是cpu核数的两倍
        super(nThreads == 0 ? DEFAULT_EVENT_LOOP_THREADS : nThreads, executor, args);
    }
通过源码可以看到,默认的线程数是cpu核数的两倍。假设想自定义线程数,可以使用有参构造器:
//设置bossGroup线程数为1
EventLoopGroup bossGroup = new NioEventLoopGroup(1);
//设置workerGroup线程数为16
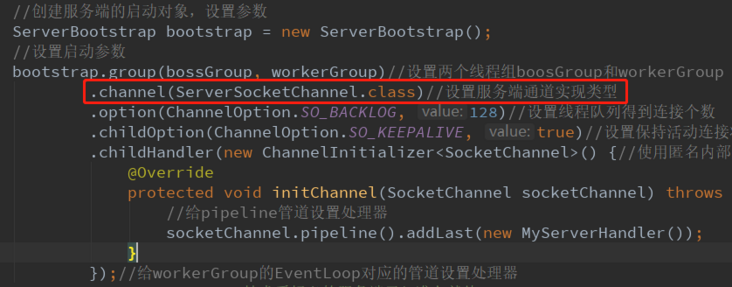
EventLoopGroup workerGroup = new NioEventLoopGroup(16);5.4.2 channel()
这个方法用于设置通道类型,当建立连接后,会根据这个设置创建对应的Channel实例。
使用debug模式可以看到
通道类型有以下:
NioSocketChannel: 异步非阻塞的客户端 TCP Socket 连接。
NioServerSocketChannel: 异步非阻塞的服务器端 TCP Socket 连接。
常用的就是这两个通道类型,因为是异步非阻塞的。所以是首选。
OioSocketChannel: 同步阻塞的客户端 TCP Socket 连接。
OioServerSocketChannel: 同步阻塞的服务器端 TCP Socket 连接。
稍微在本地调试过,用起来和Nio有一些不同,是阻塞的,所以API调用也不一样。因为是阻塞的IO,几乎没什么人会选择使用Oio,所以也很难找到例子。我稍微琢磨了一下,经过几次报错之后,总算调通了。代码如下:
//server端代码,跟上面几乎一样,只需改三个地方
//这个地方使用的是OioEventLoopGroup
EventLoopGroup bossGroup = new OioEventLoopGroup();
ServerBootstrap bootstrap = new ServerBootstrap();
bootstrap.group(bossGroup)//只需要设置一个线程组boosGroup
        .channel(OioServerSocketChannel.class)//设置服务端通道实现类型

//client端代码,只需改两个地方
//使用的是OioEventLoopGroup
EventLoopGroup eventExecutors = new OioEventLoopGroup();
//通道类型设置为OioSocketChannel
bootstrap.group(eventExecutors)//设置线程组
        .channel(OioSocketChannel.class)//设置客户端的通道实现类型
NioSctpChannel: 异步的客户端 Sctp(Stream Control Transmission Protocol,流控制传输协议)连接。
NioSctpServerChannel: 异步的 Sctp 服务器端连接。
本地没启动成功,网上看了一些网友的评论,说是只能在linux环境下才可以启动。从报错信息看:SCTP not supported on this platform,不支持这个平台。因为我电脑是window系统,所以网友说的有点道理。
5.4.3 option()与childOption()
首先说一下这两个的区别。
option()设置的是服务端用于接收进来的连接,也就是boosGroup线程。
childOption()是提供给父管道接收到的连接,也就是workerGroup线程。
搞清楚了之后,我们看一下常用的一些设置有哪些:
SocketChannel参数,也就是childOption()常用的参数:
SO_RCVBUF Socket参数,TCP数据接收缓冲区大小。
TCP_NODELAY TCP参数,立即发送数据,默认值为Ture。
SO_KEEPALIVE Socket参数,连接保活,默认值为False。启用该功能时,TCP会主动探测空闲连接的有效性。
ServerSocketChannel参数,也就是option()常用参数:
SO_BACKLOG Socket参数,服务端接受连接的队列长度,如果队列已满,客户端连接将被拒绝。默认值,Windows为200,其他为128。
由于篇幅限制,其他就不列举了,大家可以去网上找资料看看,了解一下。
5.4.4 设置流水线(重点)
ChannelPipeline是Netty处理请求的责任链,ChannelHandler则是具体处理请求的处理器。实际上每一个channel都有一个处理器的流水线。
在Bootstrap中childHandler()方法需要初始化通道,实例化一个ChannelInitializer,这时候需要重写initChannel()初始化通道的方法,装配流水线就是在这个地方进行。代码演示如下:
//使用匿名内部类的形式初始化通道对象
bootstrap.childHandler(new ChannelInitializer<SocketChannel>() {
    @Override
    protected void initChannel(SocketChannel socketChannel) throws Exception {
        //给pipeline管道设置自定义的处理器
        socketChannel.pipeline().addLast(new MyServerHandler());
    }
});
处理器Handler主要分为两种:
ChannelInboundHandlerAdapter(入站处理器)、ChannelOutboundHandler(出站处理器)
入站指的是数据从底层java NIO Channel到Netty的Channel。
出站指的是通过Netty的Channel来操作底层的java NIO Channel。
ChannelInboundHandlerAdapter处理器常用的事件有:
- 注册事件 fireChannelRegistered。
- 连接建立事件 fireChannelActive。
- 读事件和读完成事件 fireChannelRead、fireChannelReadComplete。
- 异常通知事件 fireExceptionCaught。
- 用户自定义事件 fireUserEventTriggered。
- Channel 可写状态变化事件 fireChannelWritabilityChanged。
- 连接关闭事件 fireChannelInactive。
ChannelOutboundHandler处理器常用的事件有:
- 端口绑定 bind。
- 连接服务端 connect。
- 写事件 write。
- 刷新时间 flush。
- 读事件 read。
- 主动断开连接 disconnect。
- 关闭 channel 事件 close。
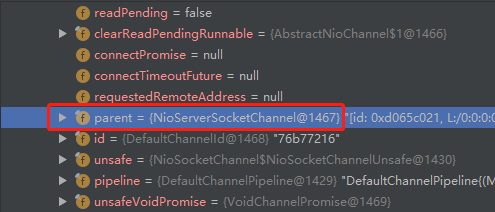
还有一个类似的handler(),主要用于装配parent通道,也就是bossGroup线程。一般情况下,都用不上这个方法。
5.4.5 bind()
提供用于服务端或者客户端绑定服务器地址和端口号,默认是异步启动。如果加上sync()方法则是同步。
有五个同名的重载方法,作用都是用于绑定地址端口号。不一一介绍了。
5.4.6 优雅地关闭EventLoopGroup
//释放掉所有的资源,包括创建的线程
bossGroup.shutdownGracefully();
workerGroup.shutdownGracefully();
会关闭所有的child Channel。关闭之后,释放掉底层的资源。
5.5 Channel
Channel是什么?不妨看一下官方文档的说明:
A nexus to a network socket or a component which is capable of I/O operations such as read, write, connect, and bind
翻译大意:一种连接到网络套接字或能进行读、写、连接和绑定等I/O操作的组件。
如果上面这段说明比较抽象,下面还有一段说明:
A channel provides a user:
the current state of the channel (e.g. is it open? is it connected?),
the configuration parameters of the channel (e.g. receive buffer size),
the I/O operations that the channel supports (e.g. read, write, connect, and bind), and
the ChannelPipeline which handles all I/O events and requests associated with the channel.
翻译大意:
channel为用户提供:
- 通道当前的状态(例如它是打开?还是已连接?)
- channel的配置参数(例如接收缓冲区的大小)
- channel支持的IO操作(例如读、写、连接和绑定),以及处理与channel相关联的所有IO事件和请求的ChannelPipeline。
5.5.1 获取channel的状态
boolean isOpen(); //如果通道打开,则返回true
boolean isRegistered();//如果通道注册到EventLoop,则返回true
boolean isActive();//如果通道处于活动状态并且已连接,则返回true
boolean isWritable();//当且仅当I/O线程将立即执行请求的写入操作时,返回true。
以上就是获取channel的四种状态的方法。
5.5.2 获取channel的配置参数
获取单条配置信息,使用getOption(),代码演示:
ChannelConfig config = channel.config();//获取配置参数
//获取ChannelOption.SO_BACKLOG参数,
Integer soBackLogConfig = config.getOption(ChannelOption.SO_BACKLOG);
//因为我启动器配置的是128,所以我这里获取的soBackLogConfig=128
获取多条配置信息,使用getOptions(),代码演示:
ChannelConfig config = channel.config();
Map<ChannelOption<?>, Object> options = config.getOptions();
for (Map.Entry<ChannelOption<?>, Object> entry : options.entrySet()) {
    System.out.println(entry.getKey() + " : " + entry.getValue());
}
/**
SO_REUSEADDR : false
WRITE_BUFFER_LOW_WATER_MARK : 32768
WRITE_BUFFER_WATER_MARK : WriteBufferWaterMark(low: 32768, high: 65536)
SO_BACKLOG : 128
以下省略...
*/
5.5.3 channel支持的IO操作
写操作,这里演示从服务端写消息发送到客户端:
@Override
public void channelRead(ChannelHandlerContext ctx, Object msg) throws Exception {
    ctx.channel().writeAndFlush(Unpooled.copiedBuffer("这波啊,这波是肉蛋葱鸡~", CharsetUtil.UTF_8));
}
客户端控制台:
//收到服务端/127.0.0.1:6666的消息:这波啊,这波是肉蛋葱鸡~连接操作,代码演示:
ChannelFuture connect = channelFuture.channel().connect(new InetSocketAddress("127.0.0.1", 6666));//一般使用启动器,这种方式不常用通过channel获取ChannelPipeline,并做相关的处理:
//获取ChannelPipeline对象
ChannelPipeline pipeline = ctx.channel().pipeline();
//往pipeline中添加ChannelHandler处理器,装配流水线
pipeline.addLast(new MyServerHandler());
5.6 Selector
在NioEventLoop中,有一个成员变量selector,这是nio包的Selector,在之前《NIO入门》中,我已经讲过Selector了。
Netty中的Selector也和NIO的Selector是一样的,就是用于监听事件,管理注册到Selector中的channel,实现多路复用器。
5.7 PiPeline与ChannelPipeline
在前面介绍Channel时,我们知道可以在channel中装配ChannelHandler流水线处理器,那一个channel不可能只有一个channelHandler处理器,肯定是有很多的,既然是很多channelHandler在一个流水线工作,肯定是有顺序的。
于是pipeline就出现了,pipeline相当于处理器的容器。初始化channel时,把channelHandler按顺序装在pipeline中,就可以实现按序执行channelHandler了。
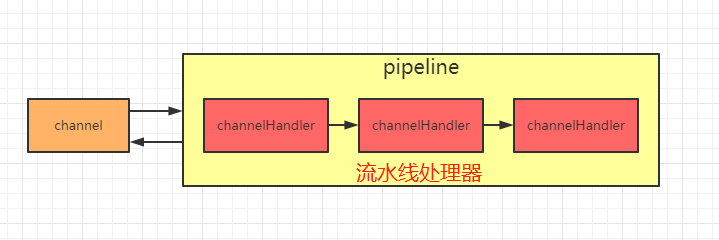
在一个Channel中,只有一个ChannelPipeline。该pipeline在Channel被创建的时候创建。ChannelPipeline包含了一个ChannelHander形成的列表,且所有ChannelHandler都会注册到ChannelPipeline中。
5.8 ChannelHandlerContext
在Netty中,Handler处理器是有我们定义的,上面讲过通过集成入站处理器或者出站处理器实现。这时如果我们想在Handler中获取pipeline对象,或者channel对象,怎么获取呢。
于是Netty设计了这个ChannelHandlerContext上下文对象,就可以拿到channel、pipeline等对象,就可以进行读写等操作。

通过类图,ChannelHandlerContext是一个接口,下面有三个实现类。
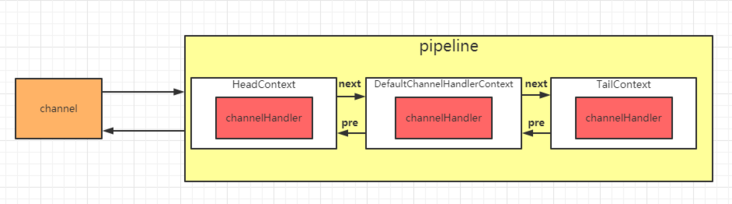
实际上ChannelHandlerContext在pipeline中是一个链表的形式。看一段源码就明白了:
//ChannelPipeline实现类DefaultChannelPipeline的构造器方法
protected DefaultChannelPipeline(Channel channel) {
    this.channel = ObjectUtil.checkNotNull(channel, "channel");
    succeededFuture = new SucceededChannelFuture(channel, null);
    voidPromise =  new VoidChannelPromise(channel, true);
    //设置头结点head,尾结点tail
    tail = new TailContext(this);
    head = new HeadContext(this);

    head.next = tail;
    tail.prev = head;
}
下面我用一张图来表示,会更加清晰一点:
5.9 EventLoopGroup
我们先看一下EventLoopGroup的类图:

其中包括了常用的实现类NioEventLoopGroup。OioEventLoopGroup在前面的例子中也有使用过。
从Netty的架构图中,可以知道服务器是需要两个线程组进行配合工作的,而这个线程组的接口就是EventLoopGroup。
每个EventLoopGroup里包括一个或多个EventLoop,每个EventLoop中维护一个Selector实例。
5.9.1 轮询机制的实现原理
我们不妨看一段DefaultEventExecutorChooserFactory的源码:
private final AtomicInteger idx = new AtomicInteger();
private final EventExecutor[] executors;

@Override
public EventExecutor next() {
    //idx.getAndIncrement()相当于idx++,然后对任务长度取模
    return executors[idx.getAndIncrement() & executors.length - 1];
}
这段代码可以确定执行的方式是轮询机制,接下来debug调试一下:
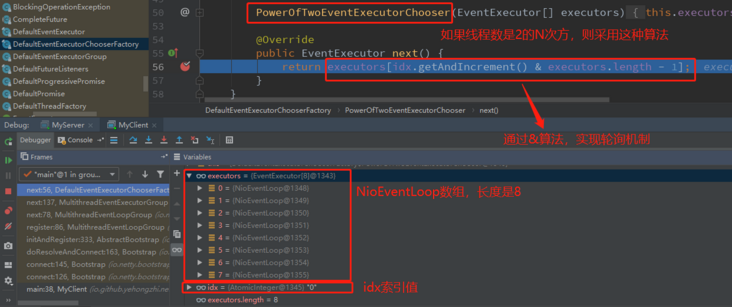
它这里还有一个判断,如果线程数不是2的N次方,则采用取模算法实现。
@Override
public EventExecutor next() {
    return executors[Math.abs(idx.getAndIncrement() % executors.length)];
}转载链接:https://segmentfault.com/a/1190000023840032,整理:沉默王二
GitHub 上标星 10000+ 的开源知识库《二哥的 Java 进阶之路》第一版 PDF 终于来了!包括Java基础语法、数组&字符串、OOP、集合框架、Java IO、异常处理、Java 新特性、网络编程、NIO、并发编程、JVM等等,共计 32 万余字,500+张手绘图,可以说是通俗易懂、风趣幽默……详情戳:太赞了,GitHub 上标星 10000+ 的 Java 教程
微信搜 沉默王二 或扫描下方二维码关注二哥的原创公众号沉默王二,回复 222 即可免费领取。
